How to Photograph a Proposal - 12 Important Tips for Shooting your First Proposal Photoshoot

Surprise proposals were something I never really wanted to get involved with. They always seemed like they’d be extremely stressful and just not worth the hassle. I definitely didn’t want to be responsible for one going wrong!
But then one day, I was asked to help shoot one and hey, whadyaknow, I quickly realised that I loved them more than any other style of shoot!
If you love love and love seeing people happy, then it doesn’t get much better than a proposal photoshoot! …Yes, the stakes are pretty high, but being asked to be a part of someone’s special moment is an amazing, unforgettable experience (as long as they say yes :).
When a photographer becomes a proposal planner
Everyone wants to have the perfect proposal.
As I see it, when you propose to your partner you’re giving her two things; 1. A ring (because you know everyone is going to ask to see it), and 2. a proposal story (because, again, everyone is going to ask how you proposed).
So knowing that everyone is going to ask about it, proposals and proposal photos have become kind of a big deal; everyone wants to have that perfect ‘instagrammable’ proposal shot to share with their friends and family.
As a photographer, that means one thing; a tremendous amount of expectation and pressure to absolutely nail the proposal shoot. As a result, it makes sense that photographers are now expected to be a kind of ‘unofficial proposal planner’ too. After all, we (should) know what looks good, and where all the best spots are etc., why shouldn’t we take charge?!
Making the proposal easy
But that means it rests on your shoulders to ask all the right questions, plan to a T and strip away all the unknown variables from the shoot. Because of your due diligence and preparation before the shoot, the client should be able to just show up and propose in the perfect position and get the perfect photos!
Sounds easy right?
Well, after dozens of proposals in Banff, I’ve come to realise that as long as you ask the right questions upfront and prepare properly, everything goes without a hitch!
But the problem is, when you’re just starting out, you might not really know which questions you should be asking! There’s actually a LOT to think about.
There are plenty of great proposal planning resources available on the internet, but I thought I’d use this post to dive into some of the specific ways that I have personally improved my proposals (and some tips for avoiding pitfalls!).
Note: I’m not going to talk about the actual proposal gameplan itself here, and thought I’d save that for another blog post entirely (coming soon!)
1. Watch the weather like a hawk and have a plan for every situation

what do you do when there’s a blizzard and 2 feet of snow overnight?!
You check the weather forecast and find that there’s an ’insert terrible weather’ at your proposal location. What do you do?
Well, not surprisingly, this has actually happened to me on more than one occasion, so here’s how I generally deal with it:
If there’s >3 hours before the shoot:
“Do you want to reschedule?” YES/NO
If yes, great, if not, “does the weather greatly impact the choice of backdrop?” “Could we change location to (a previously discussed) backup?” For example, a close-up waterfall, rather than a mountain backdrop. YES/NO
If no, “does the weather look like it’ll only be for a little while?” “Can you stall for a little while to see if it blows through?” YES/NO
If no, “do you have the right gear for the weather?” YES/NO
If no, “do you want to cancel the shoot” (generally no refund if they cancel this late)? YES/NO
This is usually enough to adequately prepare the client for the poor weather potential and allow them to make an informed decision.
< 3 hours before the shoot/ if I’ve already set off:
“I’m here and the weather is terrible. Do you want to cancel/reschedule?” (should already have prepared client that they’ll have to pay me for my time and will get a discount on the rescheduled shoot. No refund on cancellation). YES/NO
If NO, “Do you want to stall for 30 minutes and wait out the weather?” YES/NO?
If NO, “OK make sure you wear the right gear, see you soon! Here’s what I’m wearing …” (if it’s different gear to previous discussion)
As far as scripts go, I don’t follow this religiously, but it’s a good way to quickly inform the client that the weather is bad and see where their head is at.
I find that you generally can’t find out how the client will react until they’re actually faced with the bad weather itself.
And remember, great photos are possible in any weather, but make sure they have the option to adapt if at all possible. After all, your job is to facilitate the best possible photos!
2. Get to the location early
There are two very important reasons to get to the location super early:
1. You have to get there before the couple
Nothing could be worse than arriving at a proposal shoot late, especially if you’re supposed to be hiding in the bushes. The client might assume you’re hiding there and could easily go ahead without you. DISASTER!
Even arriving a few minutes early is cutting it close. My experience is that the client is anxious to get the proposing over with, and often arrives early.
If, from your discussions, you get the impression that your client is meticulous and a planner, it’s a HUGE red flag that they’ll be extra extra early. Seriously, I’ve had couples arrive more than 30 minutes early.
To avoid any stress, I generally arrive an hour early. That might sound like overkill, but sometimes it really pays off. And that leads me to my second point:
2. You need to claim your agreed location before someone else does.
This is particularly true in popular tourist spots. If you’ve picked out the perfect spot for your proposal, it would be an absolute nightmare if someone else was standing there when your couple arrived.
Get there early, stake your claim with a tripod and relax. Then, just as the couple arrive, move your tripod as if you’ve found a better location for your shot!
3. Scout your location in advance at the same time of day
Scouting out your location goes without saying, but it’s a really good idea to visit it within the same week to get a sense of the lighting at the time of day you’ll be shooting.
For my own shoots, I like to shoot either at sunset or sunrise as there’s a very small window of good light that makes for the best shots. Sunrise and sunset changes every day, so what works in mid-summer might not work in the spring.
Scouting the conditions as close to the date as possible will give you the best chance of success.
Also, actually visiting in person is great for 2 more reasons:
You can see what crowd levels are like at your proposed time.
You can use an augmented reality app to see where the sun will be at the time of the shoot. I recommend using the Photopills app to double check the lighting at your proposal time!
4. Have a backup location within walking distance of your actual location
This might sound like overkill, but what happens if you get to your spot early and for one reason or other you can’t access it?!
This actually happened to me last year.
I arrived early at a rock we’d chosen for a sunrise proposal (at around 6.30am!), turned the corner and suddenly, my mouth dropped to the floor.
My favourite spot that’s virtually always empty was crawling with people. We’d happened to pick the same time for our shoot as a major Helly Hansen photoshoot. There were at least 20 people with all sorts of props and equipment on the rock we wanted to use, and there was no way they’d be finished before my client arrived.
Fortunately, I was very early and had time to communicate this with the client, who still wanted to push ahead, and luckily I was able to move the proposal to a backup spot nearby.
This wouldn’t have been possible if I hadn’t a) been super early, and b) hadn’t already picked out several back up spots in the area.
It pays off to be extra prepared!
5. Expect to lose contact with your client
Your clients have enough on their plate without having to worry about talking to you on the day, particularly if you’re texting them at 5am before the shoot.
You should have absolutely everything planned before the shoot so that no information needs to change hands on the day (apart from ‘big picture things’, like emergency changes) .
You should already know what they’ll be wearing, where they’ll be and at what time etc, and shouldn’t rely on being able to communicate. Your client should have an intimate understanding of what they need to do, how they’re going to propose, any signals you’ll be using to communicate etc., well before they set off in the morning.
As an example, I shoot a lot of proposals at Moraine Lake, in Banff National Park. As soon as you get within 15 minutes of Moraine Lake, all cell service disappears. You’re completely on your own and cannot communicate again once you’re there.
The Moraine Lake Snooze proposal
One proposal I shot at Moraine Lake failed on the first attempt because the partner dozed off waiting for the sunrise, and then sadly, the clouds rolled in once she was awake!
I stood there for 3 hours waiting for the clouds to part for the perfect proposal, but in the end, no luck!

Not the best lighting conditions for the second attempt, but still turned out well!
Fortunately, we’d discussed the potential for bailing and coming back when the weather was better, and nothing needed to be said at the time. I saw my client walking away and knew it meant we’d try again later.
Again, this would have been a disaster if we hadn’t already discussed contingencies beforehand!
6. Hiding in plain sight

I usually wear a bright yellow jacket so that you can spot me from a distance
Whenever I shoot a proposal and we’ve chosen the sneaky paparazzi approach, I actually choose to hide in plain sight, rather than being a creepy photographer in the bushes.
This can be a challenge if you’re a friend of the partner, but if they don’t know you, you can stand brazenly in front of them and they’ll never suspect a thing! As long as you’re acting normally, they’ll just assume you’re there to take photos.
The great thing about the doing a proposal shoot in Banff is that there’s always someone there taking photos, so you being there with a tripod is completely normal!
I even take things a step further and usually wear the brightest jacket I can find, which for me is usually bright yellow!
Considering I’m also 6’3, it means my client can spot me from a mile away. This is a great way to take pressure off the client, who might be stressing about finding the right location that you’ve picked out together. I usually like to arrive early, set up my tripod and pretend I’m taking landscape shots.
If my client is anywhere in the area, they literally cannot miss me. It works every time, particularly trying to propose somewhere super busy, like Moraine Lake!
7. Know the terrain
In proposals, generally it’s the photographer that helps decide the location. That’s particularly the case for vacation proposals. It’s a regular duty of mine in Banff to provide a list of potential proposal spots.
As the lead planner, it’s imperative that you know the area and can coach the client about the conditions and the correct clothing that they’ll need. i.e bring a big coat, grippy boots, gloves, hand warmers, no heels, umbrella etc.
You should also be able to judge what they’re asking you to do, and suggest alternatives if it’s unlikely to turn out the way they’re hoping.
Example: A canoe proposal at Emerald Lake
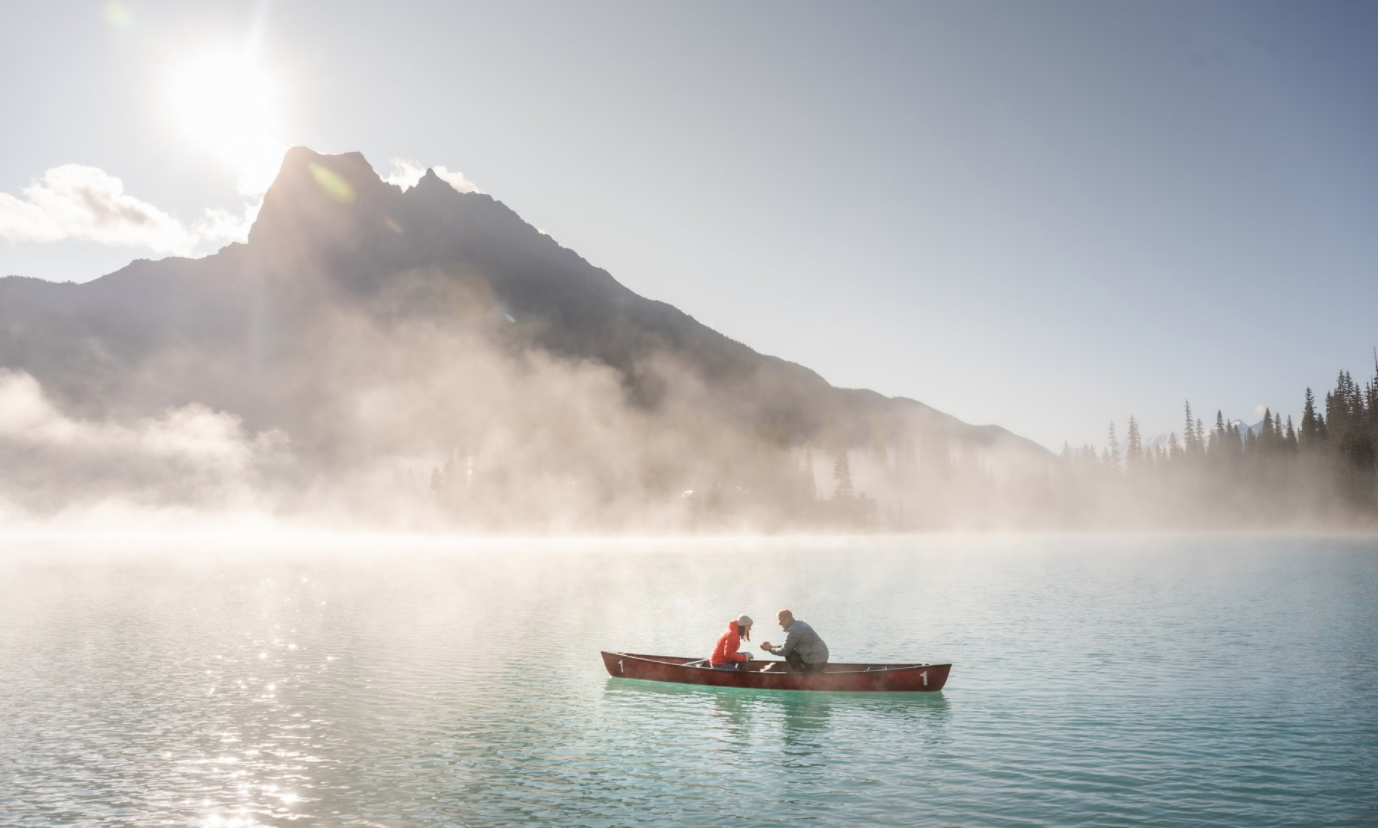
The most extreme request I usually get each year is a canoe proposal, and let me tell you, it brings me out in cold sweats!
I’m always open to the idea, but know that it’s important to let the client know that there are significant challenges that come with a canoe proposal. I always make sure to give them all the information before I agree.
For example, canoes are very wobbly, and the seats are very widely spaced. Getting down on one knee on a canoe, and getting close enough to your partner (who will have to turn around) can be extremely challenging! That’s before we even get into aligning the canoe perfectly with the shore and backdrop.
But, if the client knows all the risks and still wants to go for it, it’s game on! I just feel like you need to let them know what they’re getting into first.
The shot above was from one of those sweat-inducing canoe proposals!
8. Agree to a signal when the client is ready to propose
A ‘Go’ signal is probably one of the most important pieces of the proposal puzzle.
There’s a lot of farting around when it comes to a proposal; the couple get there, they wander around a little bit, the client summons up their courage etc., so it’s very helpful to have some kind of signal to let you know it’s about to happen and that you should get ready.
If you’re directing the couple, it’s quite straightforward and you can manoeuvre the couple into position and then give a signal like, “I love this spot”, “this is perfect” etc. Something that lets the client know, ‘ok, this is it’.
If you’re hiding in the bushes, it’s a little trickier. Generally, I like to have the client take a selfie to let them know they’re ready, because a) it’s a very clear sign, and b) it' gives you a few seconds to get in position.
You never know how quickly the client is going to breeze through the proposal, so this is a great way to prime yourself for the big moment.
9. Keep it simple, stupid
This ties in quite well with number 7., but knowing when to say no to an idea is really important. Some ideas sound amazing in your head but as soon as things get too complicated, the risk of things going wrong increases exponentially.
Certainly entertain the ideas and do your best to achieve the photos your client is after, but if it sounds like it’s too complicated, gently try to steer them towards something simpler and more feasible. The less moving parts, the better!
Or, if they’re not willing to stray from the plan, make sure they’re at least aware of the risks involved and the potential for mishaps.
10. Bring backups of everything
Electronic equipment is notorious for failing at the worst possible time; bringing back up equipment is good advice for all photography, let alone proposals.
If you have another camera, definitely bring it, and equip one with a wide lens and one with a telephoto. This will give you a great range of shots to give the couple.
Also, it almost goes without saying, but bring spare batteries and memory cards, and if possible, enable the setting on your camera that allows you to write on two cards at once. This means every shot is backed up before you’ve even finished the shoot!
Spare batteries are especially important in the winter when the cold can kill batteries in minutes!
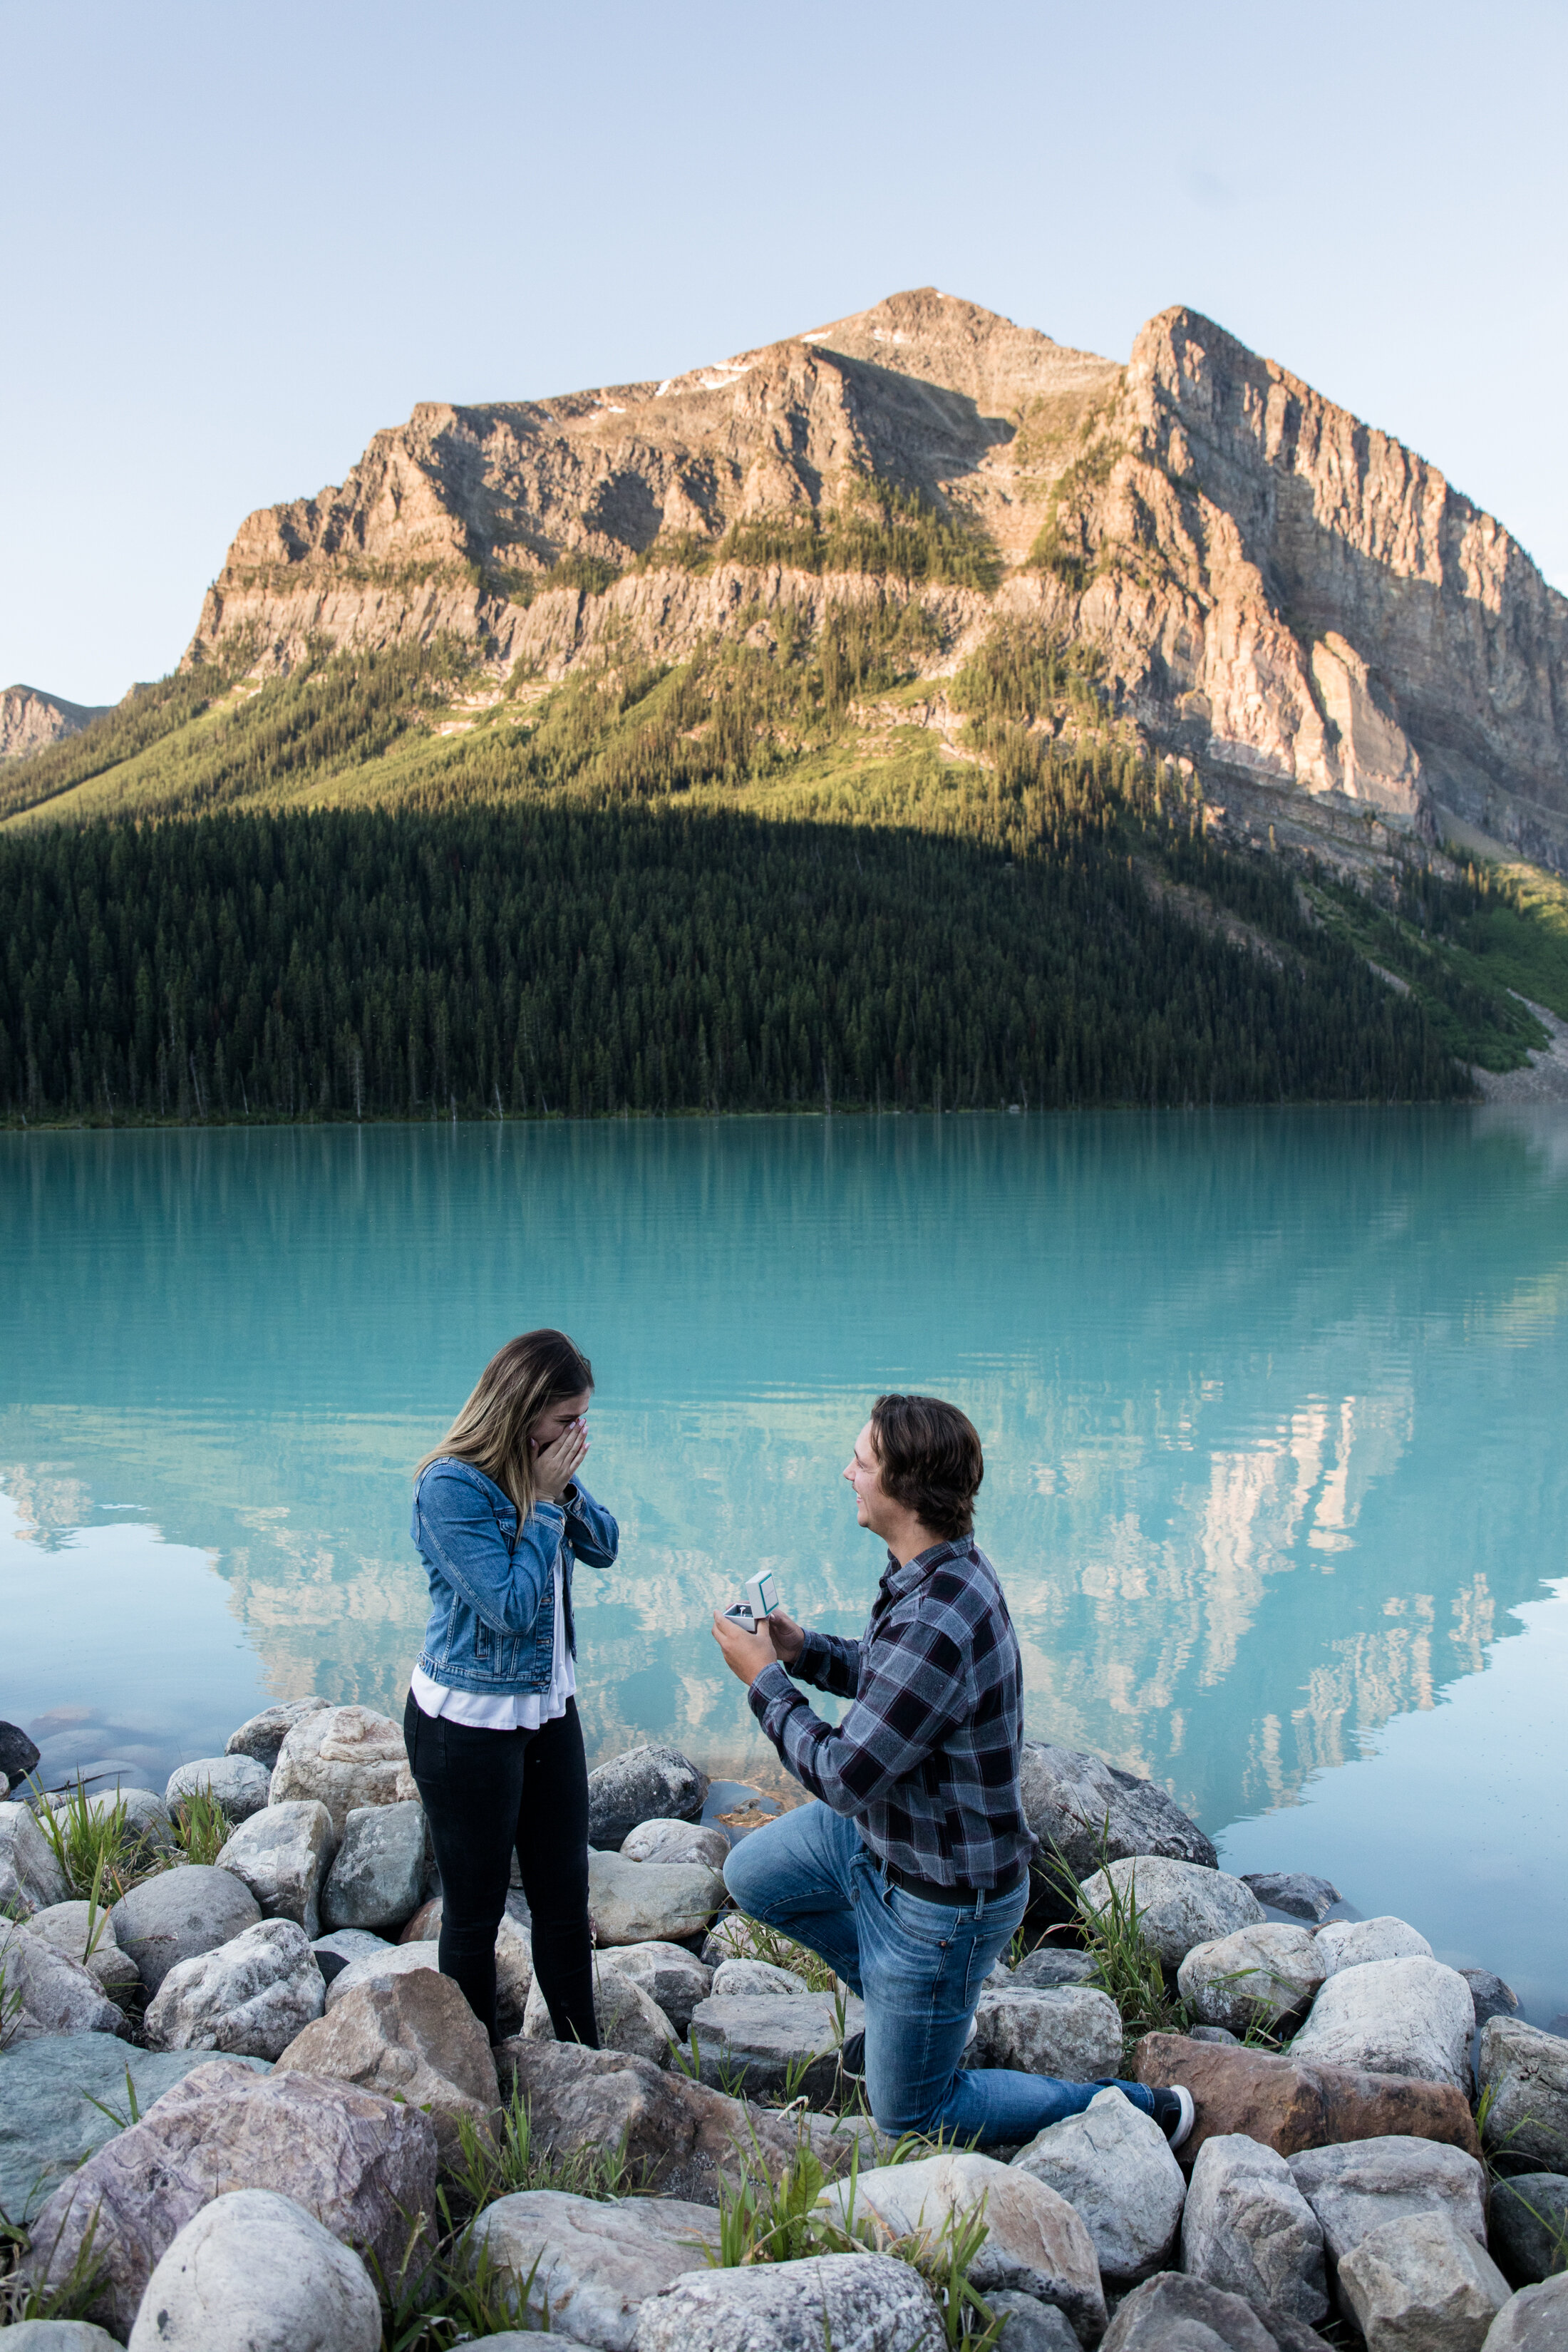
11. Pick a zoom lens for the proposal and recreate everything else after
My personal preference for proposals is to use a 70-200mm lens and shoot from a distance. This is the perfect lens for zooming in and grabbing close-ups of the reactions, and also getting a bit wider for full body shots.
If you don’t have two cameras, stick with a telephoto lens and capture the raw emotions and the reactions of the partner up close, and worry about the wider stuff later.
It’s better to catch everything with one type of lens, than miss something important while you were switching cameras (IMO).
Once the moment has passed and you, the photographer have been introduced, ask them to recreate any angles you didn’t quite catch with your wider lens.
The recreating step is actually really important, and after the proposal is finished, give them a few minutes to enjoy the moment while you look back through your photos of the event. You need to make sure you’ve got the banker shots in focus, otherwise, sorry, you’re going to have to recreate them too!
The worst thing would be to get home and find that all the shots were out of focus.
I like this order of shooting, but will reverse it if the client says their most important shot is the wide, epic, mountain shot of the proposal. This is why it’s important to have a chat with them prior to the shoot!
12. Camera settings - Avoid capturing the moment with a super wide aperture

This down to personal preference here, but the most important thing for the actual proposal moment is to make sure everything is in focus.
Now is not the time to use your best f1.4 lens that’s notoriously bad at focusing on the right place. Once the moment has passed, feel free to recreate and get that bokeh and beautiful cinematic shot with a wide aperture, but don’t do it if you’ll risk having blurry shots.
Also, make sure you’re shooting at a faster shutter speed; I’d say 1/300th second minimum, just to be safe. If you have to crank the iso a bit just to make sure you get the shot, so be it. Don’t risk getting a blurry shot for the sake of a little grain.
Again, this all comes down to personal preference, so if you feel comfortable shooting wide open then go for it!
That’s a wrap!
Those were some tips and tricks I wish I’d had help with when I first started out, so I hope you found them helpful!
Get in Touch!
If you’re thinking about proposing, eloping, you need a wedding photographer, engagement photos or just want a shoot (whether it’s in Banff or anywhere else in the world) give me a shout and I’d love to try and work something out with you!
robin@tuckmedia.ca +14034012066 or fill out the contact form here!